Today, I'll show how to paint the picture from the begining. Trochę o szkicu, kompozycji i wreszcie o perspektywie. A bit of a sketch,composition and finally about perspective.
 I started from a small thumbnail sketch on a piece of paper. At this point, only I know what it represents :) I did it on the basis of a photo found on the Internet representing the interior of the country house. I made several sketches and I found interestingone of them land it also inspired for new ideas, so I started to transfer it to a larger format.
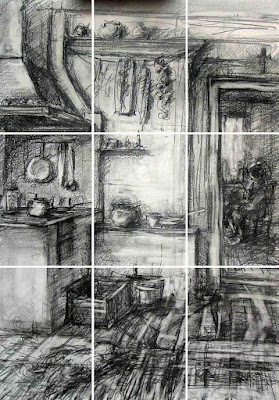
Now, I will explain why I'm doing this that way and not otherwise. I used the classical division rule - three equal parts. I tried to put importent elements on the main lines and preferably at the intersection of these lines. Here, the composition is in the process of setting so I see now that I have to move and add more elements.
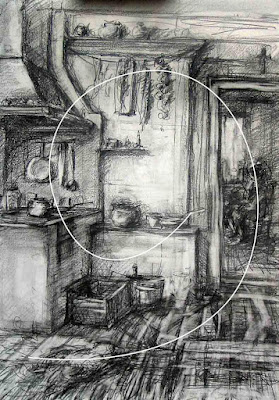 The image must be a story. The elements should guide the eye from place to place. The viewer has a tendency to "read" picture like a book so I start from the left side where I probably put a dog. The lines will direct the eye to the right to a person sitting in the other room, then fly around and read out the situation that she is likely to live in the country, she is resting now or something like that. Anyone can of course interpret my image in a completely different way, I do not care:)
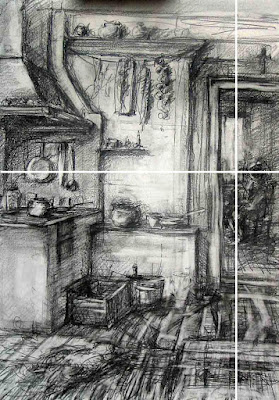
Here I show how to set a horizontal line of the horizon. Now it is at the height of the eyes of the person sitting in the background, it means that may eyes ere at this height too - so I'm sitting. Crossing the lines is the intersection point and better when it is moved to the side - not on the center.
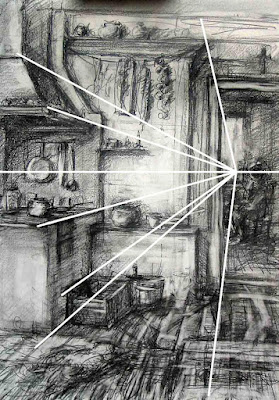
One point perspective that is shown here is as simplest because as the name suggests - there is only one point where go all lines parallel with our eyes. It is used as when we look straight at the wall. All lines perpendicular to the wall meet at one fixed point. Horizontal line is very important, because all the lines above it step down and all the lines below it go to the top. It's easy to make mistakes forgetting about it.
The lines on the wall and parallel to it are like on a technical drawing. The points of intersection of these lines produce 3D ilusion of the image. For now, I will not be inquired into the details of geometry. At the beginning to feeling a bit - the farthe the smaller and the best is to draw from nature holding pencil in hand.
 I started from a small thumbnail sketch on a piece of paper. At this point, only I know what it represents :) I did it on the basis of a photo found on the Internet representing the interior of the country house. I made several sketches and I found interestingone of them land it also inspired for new ideas, so I started to transfer it to a larger format.
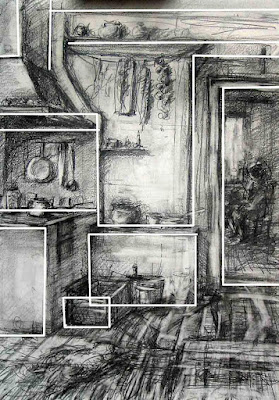
 I prepered 35cmx50cm paper planning to draw a delicate contours and paint watercolors. In the meantime, I had various ideas which I put on the paper. After some time the paper was realy dirty soI decided to create a more accurate drawing which then I would transfer to a new paper and paint watercolors. I started drawing more loosely, wipe, improve. Such a study is useful for determining darkest and brightest spots. Here I am not sure yet what to put in the foreground - a table, a dog, a rug?

Now, I will explain why I'm doing this that way and not otherwise. I used the classical division rule - three equal parts. I tried to put importent elements on the main lines and preferably at the intersection of these lines. Here, the composition is in the process of setting so I see now that I have to move and add more elements.
 The image must be a story. The elements should guide the eye from place to place. The viewer has a tendency to "read" picture like a book so I start from the left side where I probably put a dog. The lines will direct the eye to the right to a person sitting in the other room, then fly around and read out the situation that she is likely to live in the country, she is resting now or something like that. Anyone can of course interpret my image in a completely different way, I do not care:)
Here I show how to set a horizontal line of the horizon. Now it is at the height of the eyes of the person sitting in the background, it means that may eyes ere at this height too - so I'm sitting. Crossing the lines is the intersection point and better when it is moved to the side - not on the center.

One point perspective that is shown here is as simplest because as the name suggests - there is only one point where go all lines parallel with our eyes. It is used as when we look straight at the wall. All lines perpendicular to the wall meet at one fixed point. Horizontal line is very important, because all the lines above it step down and all the lines below it go to the top. It's easy to make mistakes forgetting about it.

The lines on the wall and parallel to it are like on a technical drawing. The points of intersection of these lines produce 3D ilusion of the image. For now, I will not be inquired into the details of geometry. At the beginning to feeling a bit - the farthe the smaller and the best is to draw from nature holding pencil in hand.
I showed here the way in which I start painting larger formats in more realistic way with the proper perspective. Such drawing can be then transferred to paper or underpaintings with different ways- using a grid, the backlight - depending on the situation.
I often paint without such detailed drawings - I use expression, improvise, I sketch landscapes lightly selecting the most important points. Watercolors are more lively and light this way.
I often paint without such detailed drawings - I use expression, improvise, I sketch landscapes lightly selecting the most important points. Watercolors are more lively and light this way.


